
At the time, we were a three-piece band without a drummer, bassist, or additional rhythm guitarist. The empty parts still had to be present in rehearsal, so I assigned them to Ableton Live: the computer would play the absent musicians’ parts, while anything performed live would remain absent from the project.
This article records the complete process of building my first project of that kind, using The Pretty Reckless’s “Make Me Wanna Die” as the example. The same project later became the template for every cover that followed. It is written for beginners at the point where I started; each technical term is explained when it first appears.
Define what Live should supply
One decision matters more than any software operation: Live should fill absent parts, not provide a complete backing track.
If the computer plays drums, bass, guitars, and keyboards at once, the musicians on stage are effectively performing against a finished recording. That arrangement works against the physical character of a hard-rock performance. I therefore established a simple rule: a part already played by a person must not be duplicated in the project. When a drummer is present, the drum track is muted; when the bassist is absent, the bass track is enabled.
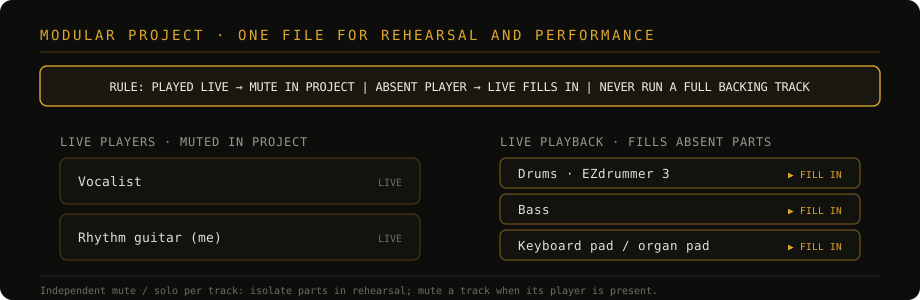
To make these combinations easy to change, the project is modular. Every instrument occupies its own track and can be muted or soloed independently. A rehearsal can isolate one part for practice, while a performance can retain only the parts missing from the live lineup. The same project therefore supports both rehearsal and performance.
This principle determines every later construction choice.
Workflow overview
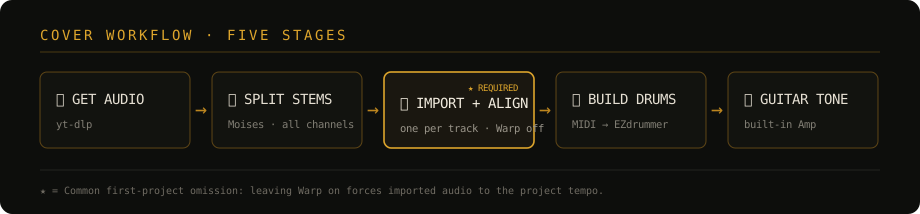
Converting a released song into a rehearsal-ready project takes five stages. The following diagram provides the complete route before the individual stages are discussed.
Song selection and tuning
“Make Me Wanna Die” runs at 97 BPM in 4/4, apart from one unusual 2/4 bar that can be addressed later. The first significant problem is the tuning.
I found a guitar transcription on Songsterr, an online tablature platform, marked for Drop D tuning. When played against the recording, however, the transcription was clearly higher—approximately one whole tone.
The recorded performance uses an overall half-step-down setup: the six strings of standard E–A–D–G–B–E are each lowered to Eb–Ab–Db–Gb–Bb–Eb. Songsterr’s transcription, by contrast, is written around Drop D at standard concert pitch. The two references therefore do not align directly.
Songsterr includes a software transpose control, which appears to solve this problem in one step. In this case, however, transposition can produce incorrect tuning labels—for example, identifying the fifth string as B. Following those labels would lead to an incorrect physical setup.
The reliable response is physical retuning. Preserve the Drop fingering and fret positions while lowering the entire instrument: Drop D, as shown in the transcription, to Drop C# for a half-step reduction, then to Drop C for a whole-step reduction that most closely matches the recording. The left-hand shapes remain unchanged while the instrument’s overall pitch moves downward.
- A convenient tool may exchange accuracy for speed. Here, Songsterr's transpose control compromises the reliability of its tuning labels.
- The transferable skill is not memorising a button, but recognising when a tool's result conflicts with the evidence. When the software and the recording disagree, verify with listening and the physical instrument.
The final key must still be chosen with the singer, because a cover arrangement has to sit inside the singer’s comfortable range. I therefore leave that decision until the full lineup can test it.
Stage one: download the audio
I use yt-dlp, a command-line download utility, to retrieve the reference audio from YouTube:
yt-dlp -f bestaudio -x --audio-format wav "https://www.youtube.com/watch?v=XXXX"The -x option extracts audio only, while --audio-format wav stores it as an uncompressed WAV file.
YouTube URLs often contain additional parameters such as &list=...&start_radio=1, which describe playlists or radio sessions rather than the individual video. Before downloading, remove everything after the video’s ?v=XXXX identifier. Otherwise, yt-dlp may attempt to process an entire playlist.
Stage two: separate the stems
A stem is an isolated component recovered from a mixed song: vocals, drums, bass, guitars, and so forth. Stem separation is central to this workflow because each instrument needs to be studied and rebuilt independently.
I use the desktop version of Moises, an AI-assisted separation tool. After importing the WAV, it produces separate vocal, drum, bass, guitar, and keyboard channels.
- Use WAV to retain an uncompressed source.
- Select Export All Channels, not Mix Download. The first option writes one file per part; the second combines the separated parts into a new stereo mix and removes the practical benefit of separating them.
Moises also includes the detected key and tempo in exported filenames, such as -C major-97bpm, which is useful when several references are being organised.
Stage three: import and align in Ableton
Drag the exported WAV files into Ableton’s Arrangement View one at a time. Selecting several files at once may place them sequentially on a single track rather than assigning one track to each source.
After import, one setting must be checked immediately:
- Warp is Ableton's automatic time-stretching system. It attempts to conform imported audio to the current project tempo. If it remains enabled, the reference may be accelerated or slowed, changing its duration and potentially its pitch.
- Select all clips, open the Clip View, and disable Warp. To change the default behaviour, open Options → Preferences → Record/Warp/Launch and set Auto-Warp Long Samples to Off.
Align every clip to the same project start and then place the music against the bar grid. In many recordings, the first strong drum beat begins at bar two, leaving bar one for an introduction or count-in.
Stage four: build the drums with MIDI and EZdrummer
Because no live drummer was available, the project needed a software drum part.
I use EZdrummer 3, a drum instrument based on recorded acoustic samples. The performance data comes from a drum MIDI file downloaded from Songsterr. MIDI contains no sound; it is a sequence of instructions describing which note—or drum—should play and when. Routing the file into an EZdrummer track turns those instructions into audio.
MIDI drum parts usually follow General MIDI (GM) mapping, a standard in which fixed note numbers correspond to kick, snare, cymbals, toms, and other pieces. A Songsterr drum file will therefore trigger most EZdrummer instruments correctly. If a cymbal, tom, or hi-hat articulation is mismatched, the relevant notes can be moved vertically in the piano roll, the grid used to edit MIDI pitches and timing.
One practical live-performance detail is a four-hit count-in. A drummer would normally strike the side of the snare or the sticks four times to establish tempo. I recreate that cue in MIDI by adding a bar before the song, setting the grid to quarter notes, and placing one note on beats one through four at C#1—GM note 37, the sidestick articulation. When the note location is uncertain, clicking the edge of the snare in EZdrummer’s kit view reveals the corresponding highlighted key.
Stage five: prepare the guitar tones
I planned to perform the rhythm-guitar part live, but the project still required a reference track and a repeatable performance tone.
Ableton’s built-in Basic Heavy Guitar Amp is sufficient for this song. The Old School or Rock presets provide the necessary hard-rock distortion without an additional purchased plugin. For lead guitar, Basic Lead can be adjusted by raising the midrange, reducing low frequencies, and adding a small amount of reverb and delay.
Ableton also provides Return tracks, such as the default A Reverb and B Delay. These operate as shared effects: increasing a track’s Send control routes part of its signal to a Return track for reverb or delay. The rhythm guitar remains completely dry, with its Sends at zero. A close and controlled rhythm sound preserves attack; excessive ambience reduces definition.
Common Ableton problems in a first project
The following problems are not unique to this song, but each interrupted my first project:
| Problem | Symptom | Response |
|---|---|---|
| Playback versus recording | Pressing Play appears to start recording, but no material is captured | The red control beside S is track Arm, not playback. A track records only when Arm is active and the main Record button is engaged. A disposable track can remain armed so that Exclusive Arm prevents accidental recording onto production tracks |
| Session View overrides Arrangement View | A MIDI controller pad is triggered accidentally and an Arrangement track becomes grey and silent | Select the orange Back to Arrangement control in the upper-right corner |
| Time signatures are anchored to the timeline | Moving notes does not create an empty bar for a structural change | Select the required bar range in the time ruler, use Insert Silence (Ctrl+I, or Cmd+I on macOS), then reposition the time-signature markers |
Converting the project into a reusable template
The main result of this project was not a single cover but a repeatable sequence: download, separate, import and align, construct the missing parts, and prepare tones. Every later cover followed the same route, with changes only where the instrument required a different method. A strummed guitar part may need only a chord chart, while a complex arpeggio still requires detailed listening and transcription.
The complete band project is also a rehearsal system. Any uncertain part can be soloed for focused practice, and each software track can be muted as soon as a musician is available to perform it.
In retrospect, the difficult part of a first project is not the interface. Software operations can be looked up and repeated. The lasting work lies in the decisions: whether to trust a transcription or one’s ear when the tuning does not match, which parts should remain live, and when a convenient tool is no longer reliable. Software will change, but those judgments transfer to the next project.